So I’ve been getting my Master’s online at Southern New Hampshire University since 2013. Getting any degree is a challenging affair, but a Master’s is a whole other ball game. Coupled with being an entirely online class, you need to be highly organized. I don’t claim to be highly organized, but over the course of 4 years I have been able to wrangle a successful (for me) organization system for my coursework. Courses at SNHU are 10 weeks long with each week called a “module”, and require you to participate in multiple discussions multiple times a week in addition to weekly assignments. It’s a lot to keep up with, and my normal way of doing homework (wait until roughly 24 hours before the assignment is due then panic and work all night) wasn’t going to cut it.
If you’d like just the process itself without explanation, click here. If you want to jump directly to a section, use this handy table of contents:
- Tools
- TLDR
- Version Control & Cloud Storage
- Text Editor
- Digital Notebook
- Task Manager
- Reference Manager
Tools
My course organization consists of Git, Dropbox, Brackets, Evernote, Remember the Milk, and Zotero. (Oh and BlackBoard, but that’s dictated by the school.) Obviously, none of these are really “required” for a system like this (other than BlackBoard); these are just the tools I prefer to use.
- Version control: Git (alternatives) – You could use any version control system or even SVN. (But why would you want to?)
- Cloud storage: Dropbox (alternatives) – You could use any cloud storage system that supports Git. Hell, you might even be able to use Dropbox and Dropbox Paper instead of Evernote.
- Text editor: Brackets (alternatives) – You could use any text editor. I use the multi-select functionality, the git integration, and infinite history in my system. (NOTE: Infinite history is a fickle beast. I have to clear it out regularly or it causes my settings file to really bloat, especially when I do web design work. Currently I clear it out once a week.)
- Digital notebook: Evernote (any alternatives with the ability to save searches) – You could use any “strict” Evernote replacement, or even a todo manager that allows attachments and notes (Asana, Todoist, etc). The key here is to be able to store text, PDFs, and/or office documents in the same “task” or “note” and receive a reminder on that task/note. I use Evernote for a lot of different things, so it makes sense to include it in any system I use.
- Task manager: Remember the Milk (alternatives) – You could use any task manager. I have been a die-hard RTM fan since 2005, only going away from the service for a brief time when I worked for Bass Pro because I needed an integration I could not afford to pay for. Their recent-ish redesign is fantastic, and you should give them a try. I use RTM in this system not only because I use it in my daily life, but also because it integrates with Evernote reminders and Google Calendar smoothly and without much trouble. They also recently added a quick add feature in their desktop app which allows me to add a task with a simple keyboard shortcut. Fantastic!
- Reference manager: Zotero (alternatives) – Really any reference manager would work. I found that Zotero was the easiest to integrate with both Google Docs and Microsoft Office and just worked best for my needs.
TLDR
Here’s a summary of the entire system if you want to copy and paste it, link to it, or just have it for easy access:
- Create a new branch named for the current term in my
/school/repository. Example:17tw4 - Delete files from the previous course.
- Create a new folder in this branch named for the current course(s). Example:
it-700 - Add relevant project files.
- Download the course files from BlackBoard.
- Copy out the module assignment list. We’ll use it later.
- Create a new notebook named for the current term in my
Schoolnotebook stack. Example:17tw4 - Create a new tag named for the current course. Example:
it-700 - Update shortcuts to point to new tags/notebooks.
- Update saved searches to point to new tags/notebooks.
- Create a course information note(s).
- Create notes corresponding to the assignment list from step #6.
- Populate notes with information.
- Annotate course documents to highlight important information.
- Set a reminder/due date on all assignment notes.
- Add start dates & subtasks, adjust due dates.
- Add relevant research with proper citation to notebook.
Let’s dive deeper into the process.
Version Control & Cloud Storage
Git & Dropbox
1) Create a new branch named for the current term in my /school/ repository. Example: 17tw4
2) Delete files from the previous course.
Creating a new branch helps me keep a nice tree of my coursework over the time I’ve been using Git, as well as lets me start fresh with the new course. I name this branch for my current term (e.g. 17tw4) and then delete the files from the previous course, being sure to retain any templates I need.
3) Create a new folder in this branch named for the current course(s). Example: it-700
Having separate folders not only keeps things organized if you have multiple courses per term, but also reminds you what course you took during what term. I still do this even when I only have a single course.
4) Add relevant project files.
For every course I take, I have some of the same files and structure. I always have a notes.txt file in the course folder(s) where I can write my course work (so it can be put in Git) and an APA template in Word format in the root folder. When I take project courses (like programming or web design) I add project folders as well. Whatever makes sense for the course, really.
Text Editor
Brackets
5) Download the course files from BlackBoard.
6) Copy out the module assignment list. We’ll use it later.
Getting the information about the course – syllabus, rubrics, assignments, etc – is one of the biggest parts of this process. Course information is usually available 2 days before the course starts, and module information usually the day that the module opens although some instructors open the entire course on day one (I love those instructors because I can work at a faster pace when I have more time, and slow down when life inevitably happens). For the pre-course organization, I look at the syllabus and copy out the module assignment list to a plain text file, then go through the list and make sure the assignment titles make sense; these will become notes in Evernote in step #12. I personally like the notes to start with the module number, then the assignment number, then the name of the assignment (e.g. 1-1 Discussion post: Getting Started). This makes it easy to sort by title or to filter out specific assignments or types of assignments in Evernote. There’s no “right” way to name these notes; just do what makes sense for you. Whatever you do, just make sure you’re consistent and you should be fine.
Digital Notebook
Evernote
7) Create a new notebook named for the current term in my School notebook stack. Example: 17tw4
8) Create a new tag named for the current course. Example: it-700
You could just use tags instead of notebooks, but I personally like the separation and the fact I don’t have to remember to tag something for it to appear in the right place. Sometimes that’s fine, but for assignments I want to make sure I’m on top of everything so I create a notebook and put anything even slightly related to my course in there. After the course is done, I can easily export all the notes in that notebook and delete it if I don’t need the notes any longer. But again, this is flexible enough you can do it either way! Again, just be consistent and you should be fine.
9) Update shortcuts to point to new tags/notebooks.
10) Update saved searches to point to new tags/notebooks.
My saved searches are part of the foundation of my system. I have a saved search that finds all notes related to the current module for my course(s), one that finds all homework in general (great for working ahead), and one for any reading associated with a course. I also add a shortcut to my term notebook and course tag(s), and remove the outdated one(s).
11) Create a course information note(s).
12) Create notes corresponding to the assignment list from step #6.
For each course, I make two notes that hold general course information; one for assignment guidelines and rubrics, and another for lectures or additional resources. These are named with 0-0 to sort them above/below all the other notes. This allows me to collect all the files provided at the start of the term into one location for easier access than finding them in Blackboard and as a bonus they are also available for searching within Evernote. Next, I make a note that corresponds to each assignment listed in the syllabus, using the list created in step #6. I sort my school notebook by recently updated, so the order that I create the notes in doesn’t matter to me at the moment. I’ve done it both in ascending and descending order and didn’t really like either way better than the other, plus the searches and tags make it easy to find the note you’re looking for so the created order seems even less relevant. Be consistent, and you’ll be fine.
13) Populate notes with information.
For courses where the instructor opens up the entire course in the first week, I can populate all my assignment notes before any work starts. Otherwise, I do this on Sundays after all my assignments are turned in and the instructor has opened up the next module. Regardless of when, I copy out the assignment details and add any relevant rubrics or guidelines to the note. Bonus: copy and pasting out of Blackboard automatically adds a link to the relevant Blackboard area if the note doesn’t already include a sourcle URL.
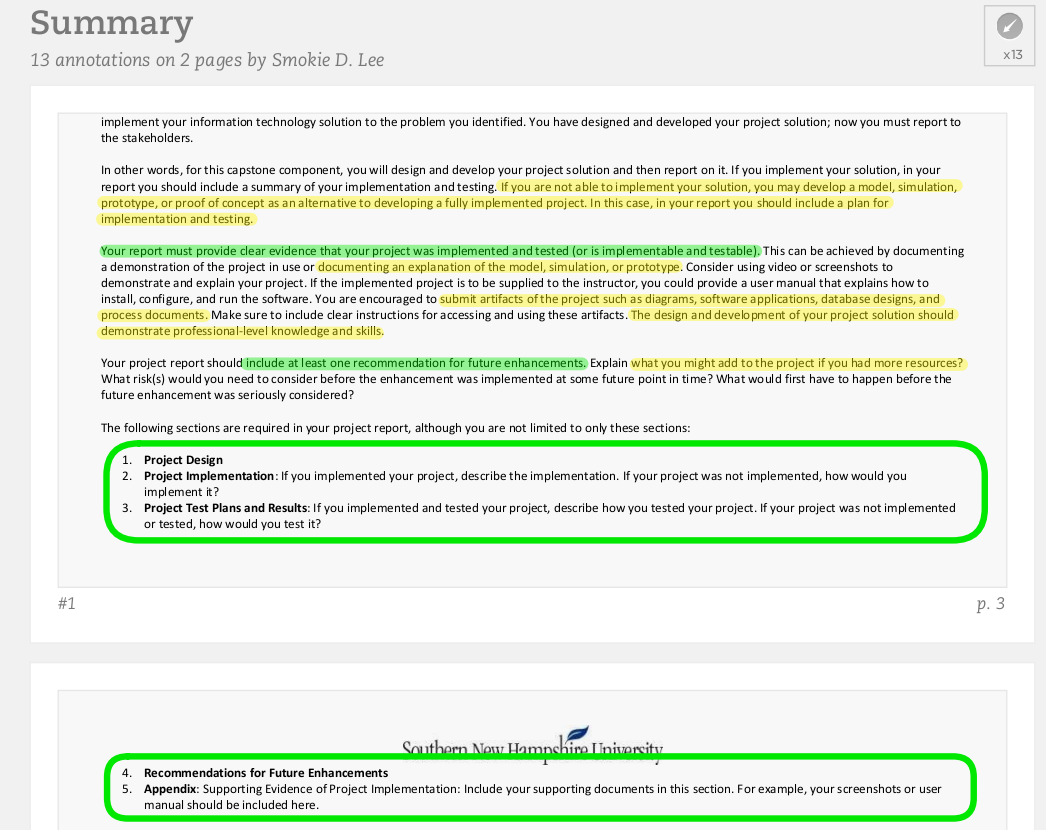
14) Annotate course documents to highlight important information.
I used to use note links but since the link doesn’t update when you change the title and break if you merge notes, I just copy the relevant documents out of the assignment guidelines and rubrics master note. Not only do things stay linked up (which is vital when you travel or are on a tight deadline and suddenly can’t remember if your report should include a title page or not), but this allows me to annotate the document specifically for each assignment. This has been especially useful during milestone assignments that are graded with the same rubric as the final project because I can focus on the information for that milestone without getting distracted by the next milestone’s information.
To do the annotations I use the built in annotation tools in Evernote for PDFs and images. The PDF annotation tools specifically are extremely helpful for research work, and the optional annotation summary is probably the best thing I’ve ever seen in any annotation software. For Word documents, I summarize the document and add the summary as plain text right above the file in the Evernote note; since Evernote Pro searches the text of Office documents, this helps provide some context for what might seem like random search results. Of course, you don’t have to do this if you don’t want to. For me, having these summaries and annotations make it easier to find information in the right context later, and since all my coursework at SNHU is related to my capstone it’s super easy to connect the research I did in a previous course to my final project.
15) Set a reminder/due date on all assignment notes.
I set a reminder on anything that I consider an assignment. This will sync the note with RTM, and any changes to the due date or title in RTM or Evernote will sync with the other. This date is usually a day or two before its actually due online to make sure that I have enough time to work on the assignment over the week.
Task Manager
Remember the Milk
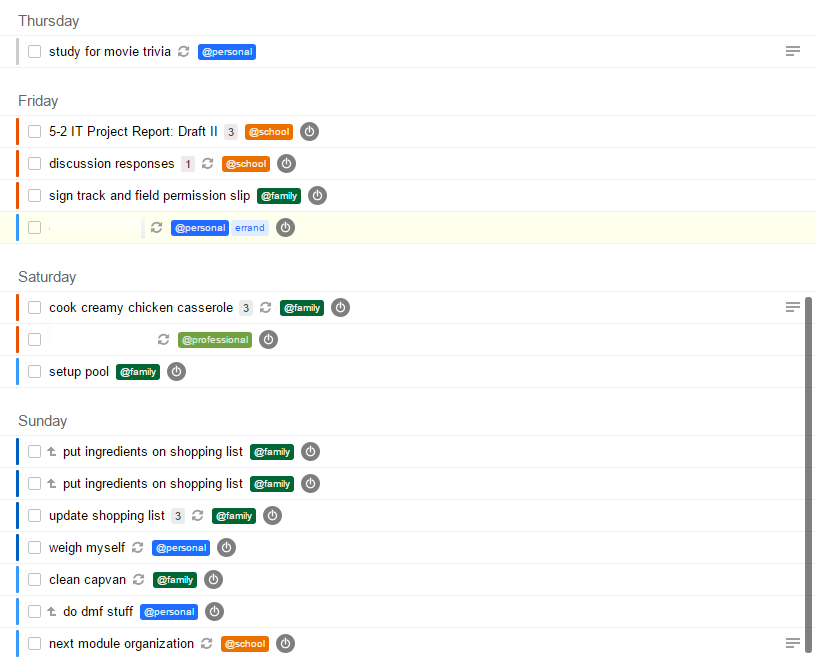
16) Add start dates & subtasks, adjust due dates.
Over in RTM, I adjust the due dates, and add start dates and subtasks if needed. Start dates help assignments show up in all my smart lists even if they aren’t due today so I can remember to balance my work and family time. If it’s a really complicated task (like final project submissions), I might add subtasks. I also take this time to tag it and give a quick time estimate, something that helps me with various smart lists.
Reference Manager
Zotero
17) Add relevant research with proper citation to notebook.
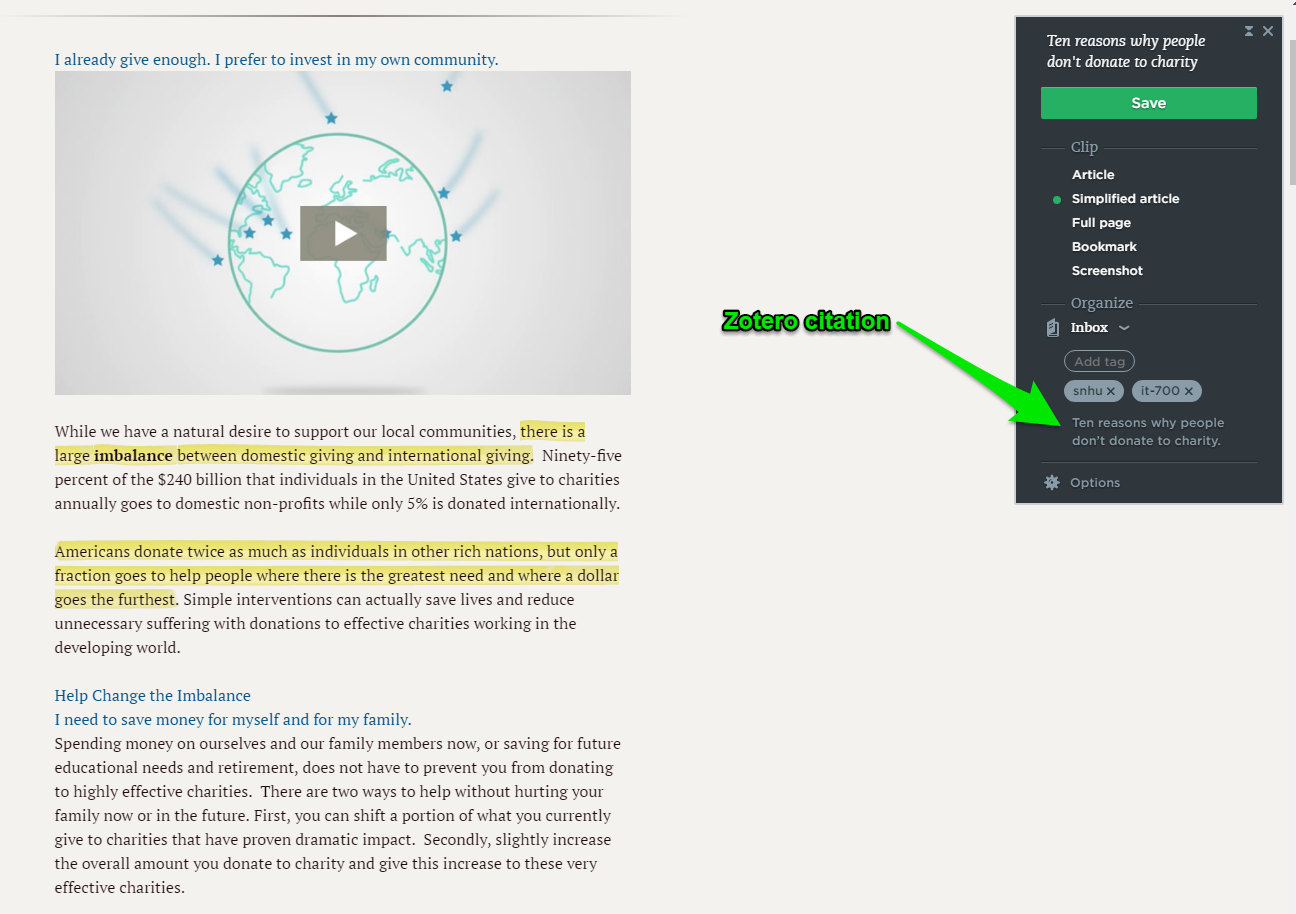
Any time during my research I find a source I want to cite, I save the page with Zotero, making sure that the author and date are collected. Once that’s done, I save the page with the Evernote web clipper to this term’s notebook using simplified mode, highlight relevant information, and copy the citation from Zotero to the remark area of the web clipper. I might also add a summary of the article if it’s particularly long or perhaps only part of it is specific to my research.
Whew! That’s a lot of information. Hopefully it was helpful to other online students (or even instructors) and gives you some ideas for organizing your educational life using digital tools you probably already have. If you have any suggestions, questions, or comments, feel free to comment below and I’ll do my best to get back to you. Thanks for reading!